Friday 6 December 2013

Christmas Stockings


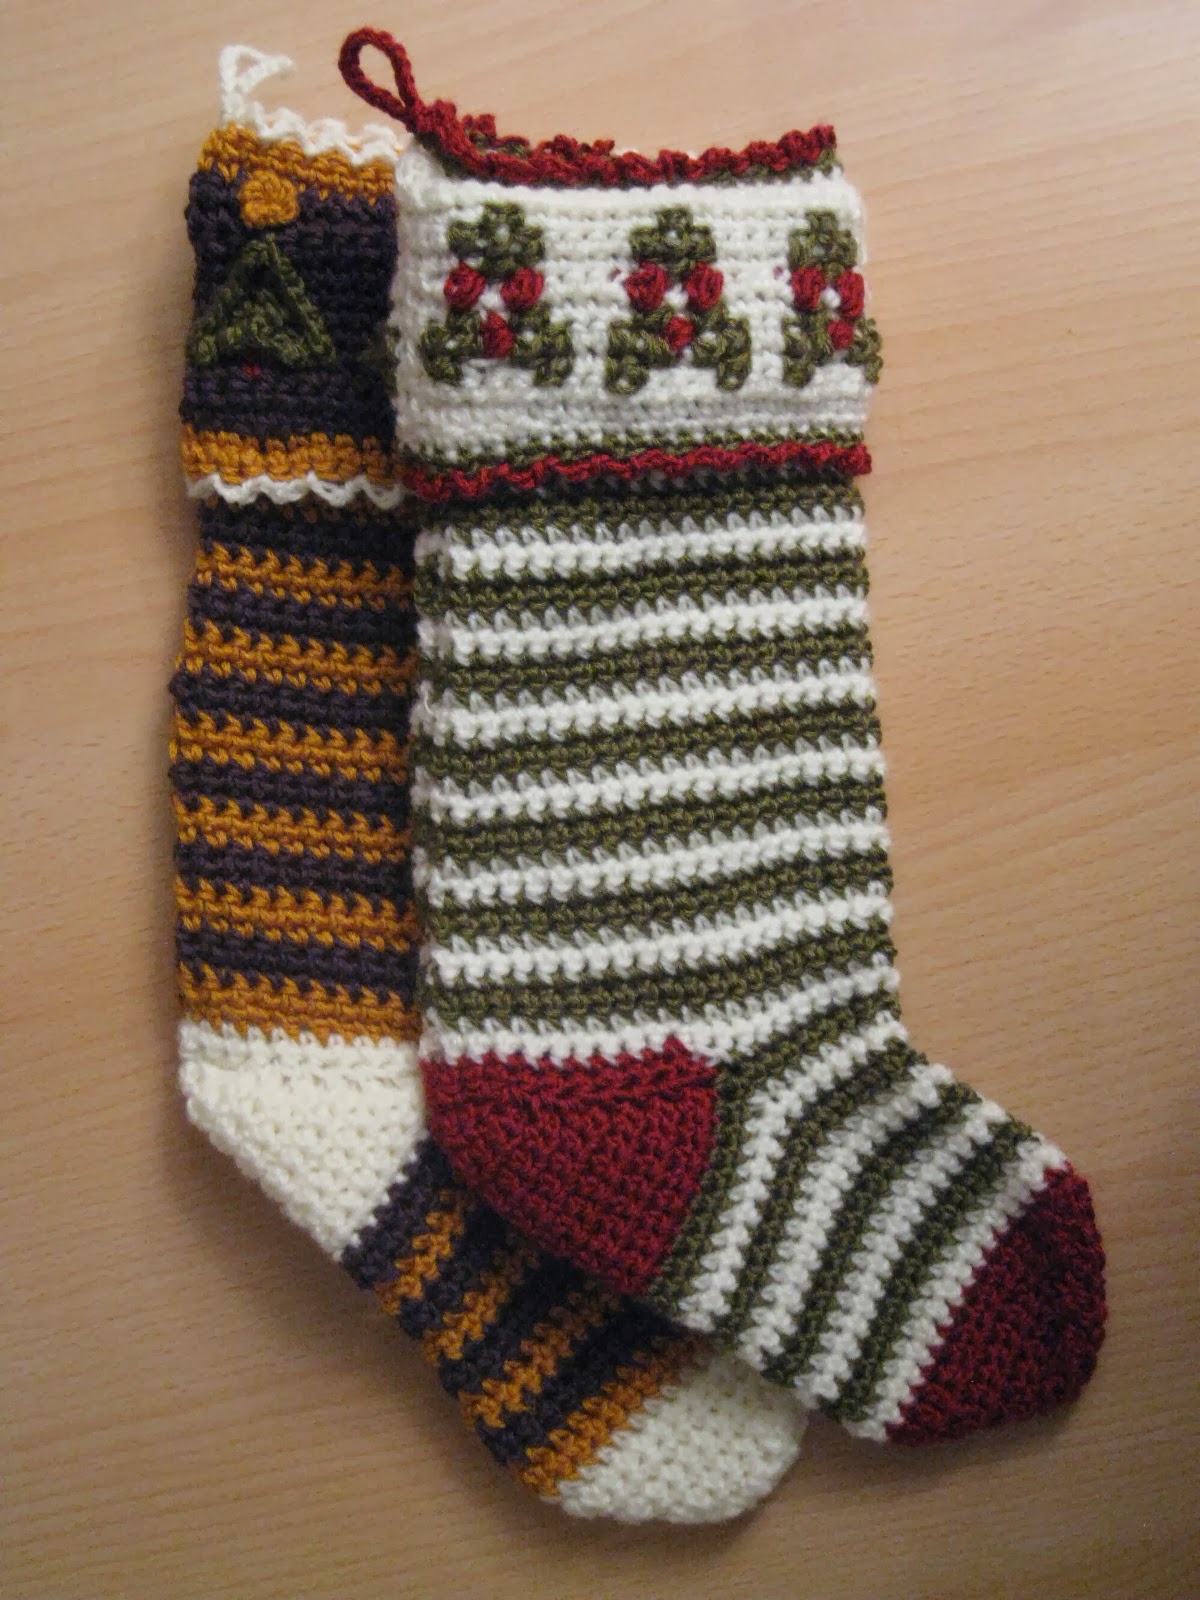
It's 6th December and here in Germany that means children get stockings filled with gifts from Nikolaus. As we have friends coming over tonight I've been busy working on a couple of stockings to fill with goodies for them.

I found the pattern through Ravelry, it's a good one, really easy, quick to make and a really beautiful end product. It's a free pattern from Red Heart, and I used my leftover stash from the wedding blanket I made last year (NaturallyCaron.com Country).

For the first one I stuck to the pattern, making version 2 with Claret, Loden Forest and some random white wool I had lying around. I used a 5.5mm hook for the first one, which was actually a little small, I moved up to 6mm for the second one.


I decided to make the second one a little different, mostly because I had quite a lot of the purple and yellow wool to use up! I stuck to the pattern until I got to the cuff...


It started off the same with a base chain of 44 in purple
Row 1: sc in each chain across, starting with second chain from hook, turn.
Row 2: ch1, sc in each sc across, turn.
Row 3: ch1, sc across, dropping purple and picking up red, according to colour chart below. Fasten off.
Rows 4-8: Join with right side facing and fasten off at the end of each row instead of turning. Work sc across with purple and green, following the colour chart. At the end of row 8, do not fasten off, turn.
**IN ROW 5** Work in BLO when working into green stitches from row 4
Rows 9-11: ch1, sc in each sc across, turn.


Number of stitches in each colour:
P = Purple, R = Red, G= Green
  1. 43 P
  2. 43 P
  3. 3P, 1R, 6P, 1R, 6P, 1R, 7P, 1R, 6P, 1R, 6P, 1R, 3P 
  4. 1P, 5G, 2P, 5G, 2P, 5G, 3P, 5G, 2P, 5G, 2P, 5G, 1P
  5. 2P, 3G, 4P, 3G, 4P, 3G, 5P, 3G, 4P, 3G, 4P, 3G, 2P
  6. 2P, 3G, 4P, 3G, 4P, 3G, 5P, 3G, 4P, 3G, 4P, 3G, 2P
  7. 3P, 1G, 6P, 1G, 6P, 1G, 7P, 1G, 6P, 1G, 6P, 1G, 3P
  8. 3P, 1G, 6P, 1G, 6P, 1G, 7P, 1G, 6P, 1G, 6P, 1G, 3P
  9. 43P
  10. 43P
  11. 43P


Trimming the trees
In row 4 (first row with green for trees) the front loops of the green yarn should be free as row 5 worked into BLO. Work with right side facing and work upside down so that the point of the tree is nearest you. Attach green yarn with sl st into first front loop of first tree, *ch2, sl st into first ch, sl st into next front loop of tree*, repeat *-* to end of first tree. Repeat this for all 6 trees. 

I then attached green yarn to the right bottom corner of a tree and did a row of single crochet up the right hand side of the tree, ch1 at the top and sc down the LHS, just to give the edges more definition and make the whole thing a bit 3D. I used the ends to anchor down all the sc's and picot where needed.

Star: working into a magic circle, start with a sl st, *ch 2, sc in first ch, sl st in ring* [point made]. Make 5 points and join last one to first with a sl st. Pull tight and sew to cuff at point of each xmas tree.

For finishing and joining, I followed the pattern, using yellow to join the cuff (so 2 rows yellow then the third row in white).

TIPS: There's a lot of sewing involved in this, the sock, cuff, foot, and toes are all need whip stitched down the seam. It's really tempting to sew it nice and tight, if you're anything like me you have to fight the fear that if it's not super tight then it will all fall apart immediately. BUT you will end up with a solid ridge along all the seams so try and sew up nice and loose. Also, don't tuck in ALL your ends as you go, you will want to use some of them for joining. 

Saturday 11 May 2013

Some non-crafty updates

I've been doing lots of gardening recently, the new veggie patch is coming along nicely and this morning my mother-in-law took me to a garden centre to buy some new flowers as she had noticed the flowers in my sandstone trough were looking very sad and past it.

So here's the replacement flowers...


I also got some flowers to fill some of the pots I bought at a flea market last weekend. Got some real bargains :) At one stall I walked away with the two red scheurich pots in the next couple of pics, plus a blue scheurich, a terracotta and a few plastic pots for just €4...


Here's what I bought for the terracotta...


Shown with the meerket Volker bought to guard my garden ;) He hasn't been named yet. My other meerkat is called Aleksander. Suggestions in the comments. I've been eyeing up this flower for ages, really love them. It's a climber so I need to find a permanent spot for it by a wall somewhere.

Next we have the small flower bed at the side of the patio, I planted out sweet peas the other day and this morning bought some small flowers to go in front.


And here are the other pots I got at the flea market, still need to buy something for them. I'm thinking the pretty, shiny one can go in the house. I'm growing some lemongrass from seed at the moment, maybe that can go in there for the bathroom or something...


And the veggies are growing! Onions, carrots, radishes and peas on the left, potatoes on the right, with herbs (chives and my birthday presents - oregano and rosemary) at the front and Lettuce and Kohlrabi in the coldbox.


In that last pic are also a couple of plants donated from Thomas & Christiane, a banana plant and fig tree.

And that's all for now :)

Friday 5 October 2012

Wedding Blanket

Heh, maybe I'm not cut out for this blogging lark, I've completely neglected it for months now! Mostly because I haven't been crocheting a great variety of things lately and I've been in and out of the country and in and out of hospital so crochet and blogging have had to take a back seat.

I went to a friend's wedding in Canada a couple of weeks ago, which was great! I decided that making a blanket would be better than buying a present so that's pretty much taken up all my crafting time for the last few months. I didn't manage to finish in time for the wedding and I'm still working on it now but the end is in sight. Right now I'm doing the annoyingly time consuming part of tidying up the squares, sewing the ends in and joining them together. I find this part extremely tedious and will be glad when it's over.

The pattern I used is a free one published by a wool manufacturer and I decided to reward them by making it with their wool (which obviously is why these companies put their free patterns out there in the first place) and I'm pleased with the results. The only change I made to the pattern was swapping out the Vicuna colour for Plum Pudding.

My ravelry project and pattern


The squares use a really cool and simple method to create a ribbed effect, I won't replicate the entire pattern here but I'll describe the ribbing effect as it was the coolest feature and I'm sure it could be adapted and used for other projects.


BPsc: Back-post single crochet—Insert hook from back to front and then to back again around post of stitch, yarn over and draw up loop, yarn over and draw through both loops on hook.
BPhdc: Back-post half double crochet—Yarn over, insert hook from back to front and then to back again around post of stitch, yarn over and draw up loop, yarn over and draw through all 3 loops on hook.
BPdc: Back-post double crochet—Yarn over, insert hook from back to front and then to back again around post of stitch, yarn over and draw up loop, [yarn over and draw through 2 loops on hook] 2 times.
BPtr: Back-post treble crochet—[Yarn over] twice, insert hook from back to front and then to back again around post of stitch, yarn over and draw up a loop, [yarn over and draw through 2 loops on hook] 3 times.
FPdc: Front-post double crochet—Yarn over, insert hook from front to back and then to front again around post of stitch, yarn over and draw up loop, [yarn over and draw through 2 loops on hook] 2 times.


I've used the FPdc to create a nice ribbed granny square...

Start with ch4 & join to make a ring

Rd 1: Ch3 (counts as first dc) 2dc, ch2, {3dc, ch2} 3 times, join with sl st.
Rd 2: Ch2 (counts as first hdc) hdc still working into ch2 corner sp, into each 3dc shell, work FPdc, hdc, FPdc and into each ch2 corner work 2hdc, ch2, 2hdc, finish with 2hdc, ch2 and join in last corner.
Rd 3: Ch2 (counts as first hdc) hdc still working into ch2 corner sp, FPdc around first hdc, *hdc into next hdc, FPdc around next dc*, *-* along each side with 2hdc, ch2, 2hdc in each corner.

Keep repeating this process of adding a new "rib" onto the first hdc on each round and adding two new hdc in the corner and just remember to always work the FPdc around the FPdc of the previous round and work the hdc's into the hdc's of the previous rounds.

And here's how it looks...


Sunday 13 May 2012

Something Old and Something New

I got a belated birthday present from my sister this week, something new to add to my stash and a pattern book to use it with full of really beautiful old-fashioned doilies. I've been eyeing it up on Ravelry for a few weeks now so when it arrived I just had to dive right in and get started!

Anchor Pearl 8...loving the selection of colours I have to work with!

The progress so far

The book is called Vintage Floral Doilies and you can buy it at Annie's Attic. Check out the one on the cover - looks amazing but I'll need to get more crochet cotton before I attack that one.I've started with the Butterfly Garden Doily and so far so good, it seems to be coming along nicely. I did have a little trouble with my first butterfly though - I found the pattern a little ambiguous in rounds 3 & 4 as it tells you to work into the chain spaces of the previous rounds but it isn't really specific about which chain spaces you're meant to work into. I settled for working the shells of round 3 into the ch1 between each shell of round 2 and skipping the ch2 spaces within each shell....although I think it would have worked equally well doing the opposite (Update: Yes, for the rest of the ones I've done so far I've worked the shells into the middle of the shells of the previous round and skipped the ch1 sp's and that works just fine). In round 4 I worked the triple crochets into the ch2 space within each shell and the sc over the ch5 sp between each shell. Hope this is useful for anyone else having similar doubts about the pattern. I'm afraid I can't give away any details of the full pattern as it's not a free one and therefore I have a feeling the author would not appreciate me publishing it here!

But how should I colour my butterflies???

I'm also having a bit of a colouring dilemma with the butterflies. The cotton I got isn't quite enough to stick to the pattern in terms of colour and although I could just buy more, I'm a little impatient and would like to crack on with what I've got so I'm thinking about adding some different colours. So far I've only done the one butterfly in light pink, which I think I'll edge with the darker pink. I might also add in some blue and of course some of the gold and purple to tie it all together. Not sure though, it's tricky!
In response to a couple of comments I've had I want to go back to the blanket I talked about in my last post. I linked the source in that post, which gives a pretty detailed description of the method but I'll just give a quickie here: It's a normal granny square, nothing fancy, just 3dc shells with ch1 in between them along the sides and ch2 in the corners. The cool colour effect is achieved by working with 4 strands of yarn together and because you're using so much yard, you need a pretty big hook, I used 10mm. Choose four colours that are quite similar and at the end of each round drop one strand of yarn and join in a new colour in its place. Every strand therefore gets kept in for four rounds and then dropped and that's how you get the colour merging effect. The border is 5dc shells in each ch sp and slst in the middle dc of each shell of the previous round. The blanket is still for sale on Etsy so if you like it, feel free to spread the word ;)

I've also been asked about the squares in my background picture so in the very near future I'll post about those. They are the "something old" in my title - they were one of the first things I crocheted back when I was learning. I got the patterns from a friend and just started making them from whatever scraps I had lying around as samplers. Someday....I don't know when, but someday, I will finally get round to making them into an afghan. I'm very good at being inspired and starting cool new projects, if only I were as good at finishing them!


Sunday 6 May 2012

Etsy

So the giant granny square is finished. It took a little longer than expected but still went quite fast. I made it up to a metre and a half with a whole rainbow of colours. I started with random odds and ends from my stash but quickly realised that my stash just wasn't up to the challenge and just had to drag myself to the wool aisle in prisma ;) i'm really pleased with how it's turned out though and I've decided it's time to try out this Etsy thing. I've set up my shop so now I'll just cross my fingers and see if I get a sale...


I haven't quite decided on my next project yet. I have a renewed stash left over from this blanket so there's lots of potential to try something interesting. I'll just need to wait for some inspiration to come my way...

Thursday 26 April 2012

Holidays, Birthdays and Hospitals

Well, the three weeks leading up to my 30th birthday have been somewhat unusual to say the least. It started with a trip to hopital here in Rauma, for pretty severe stomach pains and much to my surprise and disappointment, my quick visit to the A&E ended in 3 full days in hospital. I had to bargain hard with the doctors to get released early enough on good friday so that we could catch our flight to germany as planned...although that holiday then had to start with more visits to hopital, more scans, more blood tests. Ah well, it all worked out in the end and it was finally concluded that it had all started with a case of appendicitis. We made it to Italy for skiing although I had to lay off the apris ski this year and take it easy for a couple of days while everyone else was off having fun.

All this left plenty of time for crocheting though so I now have a second baby vest and I'm well on my way to having a second flower scarf too.

Birthday presents for the most part haven't reached me yet - one of the disadvantages of this jet set lifestyle ;) but I did receive a couple of interesting books, which combine my love of crochet with my desperate need to learn to speak fluent german. So far I haven't started any projects from them because I've been too distracted by other things but watch this space, I hope to crack them open at the weekend.


The main distraction keeping me away from these new books is a pattern I spotted on Ravelry and instantly fell in love with. It's so incredibly simple - it's just a giant granny square really - but also such an incredibly effective way of making an interesting colour effect. The idea comes from a fellow blogger: colour in a simple life
It's progressing quite quickly, with 20 rounds done already. I've been thinking about trying to sell some of my projects for a while but browsing ebay was never very encouraging - wool ain't cheap and I'm not willing to sell things at a loss. A few weeks ago a friend told me about Etsy, which is tailored to selling homemade products so I think I'll give it a try. And here's a wee preview:


Sunday 25 March 2012

Babies

It seems like there's been a real baby boom going on recently, with about half a dozen of my friends and colleagues having kids within the past year or two. For me this means there's always a need for a new baby blanket in case I'm feeling uninspired. The most recent new edition was a little girl and I decided to try something new this time - pattern linked in my previous post.

I started with a base chain of ch56 and used quite a small hook (either 2 or 2.5mm, the numbers have rubbed off and I can't remember the exact size!) so there are two more rows than the pattern recommends in the top section. I also added in a tie at the top during the final picot edging round by chaining 50 (plus 1 turning stitch) then doing three rows of single crochet. When I ended the first row I took off the yarn and inserted the hook into the next sc of the previous edging rowd and pulled the yarn through it before turning and starting the next row so it was attached well to the garment.

And here's the result:

Front
Back

I teamed it up with a blanket I finished a while back:

This is by far the most delicate blanked I've made, based on the squares in this DROPS Design pattern. It's joined with single crochet and the border is a row of single crochet then a row of picot stitches.

Another favourite from my baby blanket stash is this one, completed about a year ago:
The pattern for this was quite simple, the centre is just a granny square going on for 13 rounds, with colour 1 (pink), colour 2 (yellow) and colour 3 (white) in this order:

   Round  Colour
     1     1
     2     1
     3     2
     4          1
     5     1
     6     3
     7     1
     8     2
     9     1
    10     1
    11     3
    12     1
    13     2


Then 8 squares with colours 1,2,1,3 and 8 with colours 2,1,2,3 using the first four rounds only of SmoothFox's May Flower square, which is available as a free download from Ravelry. Again, the joining is a simple single crochet in white and the edging is a shell edging using [1 sc, skip 2 stitches, 5dc in next stitch, skip 2 stitches, 1 sc in next] for each shell.